Layout
The first thing we did was to make a map of the plot. We did this by putting in two posts a short
distance away from the plot and measuring the distance between them. Then we measured it again, and
again. We would be using triangulation and for that you need an accurate
baseline. If you get that wrong then the entire map is wrong. The basic idea is that for each
location on your plot - the far back corner of the plot, the front left corner of the shed, etc. - you
measure how far it is from the two posts and note it down on a piece of paper. Once you have a pair
of measurements for every defining spot in your plot then you can draw the map. Take a blank piece
of paper and draw a line on it near one edge to represent your baseline. Decide on a scale, say
100:1 so that every 100 cm of length of your baseline is represented on the paper by a line
1 cm long. Obviously you need to choose a scale to suit your plot and your piece of paper.
For every pair of measurements you then need to scribe a pair of arcs on the piece of paper,
centred on the two ends of the baseline and with a radius scaled from the actual measurements.
Where the two arcs cross put a dot on the paper. Once you have transferred all your data to the
piece of paper all you need to do is join the dots to get a map of your plot as it is now. This is
not a quick process, nor is it one that can be rushed, so take your time and get it right. If
you get bored then stop and go and do something else for a while. This finished map of your plot
is the blank canvas that you will draw upon as you plan your new plot. I strongly suggest that
you take a copy of the plan and draw on the copy as you devise your new garden. That way when you
change your mind you can just throw it away, take another copy, and start again.

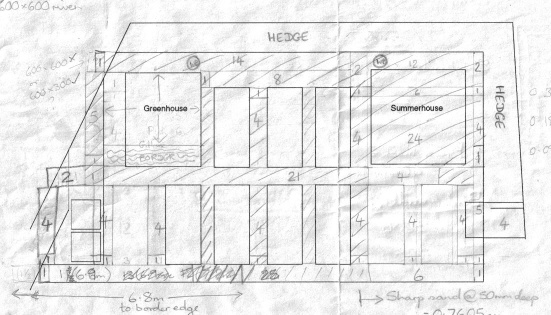
The original layout, with later amendments. Click on the image to see the full sheet.
We decided on a fairly simple layout. A large shed to be placed on the right at the back with
a small greenhouse at the back on the left. From the map we worked out we would be able to get
three raised beds between them. Each bed was to be about nine feet (2.4m) long and four feet (1.2m) wide with
the long edge running from front to back. In front of the three beds would be another three with
another one just to the left of these, in front of the greenhouse. This would be sufficient for
our three year crop rotation at two beds per crop plus one for perennial crops.
Each bed had a two foot (600mm) wide path down one side, wide enough for a wheelbarrow, and a foot
and a half (450mm) wide path down the other to give access. We still have the original plan (see above)
even though it's now rather tatty, but we
wished that we had put a date on it because we didn't get very far before everything came to
a grinding halt. We cleared an area for the shed, paved it, and then erected the shed. We
then took a break from gardening due lack of time caused by work and hobbies.
While constructing the new veg plot in 2009 we at first expanded the three year crop
rotation to a four year plan which required two more beds. We also started growing crops
in the beds as they were completed. As a result some crops were a little late going in
and some crops had to be missed out for this year. We soon discovered that we would have
to expand our scheme to a five year cycle, so yet another two beds were required. We found
that we had room for this because our initial plan was slightly wrong, it showed the plot
being almost two feet narrower than it actually is. It's a good job the mis-calculation came
down in our favour!
|